There’s an undeniable magic in the perfect lasagna-a dish that dazzles not just wiht its rich flavors but with the harmonious dance of its layers. Mastering lasagna layers is more than just following a recipe; it’s an art form that balances texture, taste, and technique to create a culinary masterpiece. Whether you’re layering tender pasta sheets, sumptuous sauces, or creamy cheeses, each step plays a crucial role in transforming simple ingredients into a symphony of comfort and indulgence. In this article, we’ll unravel the secrets behind flawless lasagna assembly, guiding you through the nuances that elevate your dish from ordinary to extraordinary.Get ready to roll up your sleeves and dive deep into the art of perfect lasagna layers.
Choosing the Ideal Ingredients for Layered Perfection
Mastering lasagna layers begins with thoughtfully selecting ingredients that harmonize texture and flavor. This iconic Italian dish thrives on the balance between rich, velvety cheeses, tender pasta sheets, and vibrant sauces. The key lies in choosing fresh,high-quality components that complement one another,setting the foundation for each luscious layer.
Start with high-protein all-purpose flour for making your pasta dough or pick delicate, no-boil lasagna sheets for ease. When crafting the meat sauce, ground beef or a combination of ground beef and turkey offers robust flavor without overwhelming the dish. Incorporate a tomato sauce brimming with ripe tomatoes, garlic, and fresh herbs like basil and oregano, ensuring the acidity cuts through the creaminess of the cheeses.
Balancing Texture and flavor in Each Layer
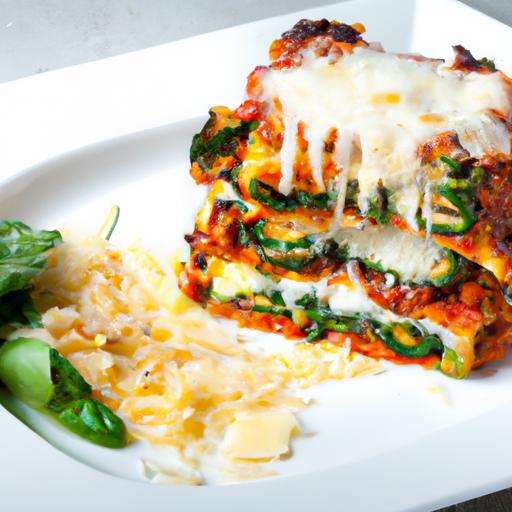
Layering is a culinary choreography. The foundational bottom layer should be saucy enough to prevent sticking while still substantial to hold the pasta together. Follow this with the creamy béchamel or ricotta mixture, ideally whipped to a light fluffiness to contrast the meat’s savoriness and pasta’s firmer bite.
Include a blend of mozzarella for meltiness,Parmesan for sharpness,and ricotta for creaminess. These cheeses introduce varied textures-from gooey, stringy melts to lightly granular richness-building a satisfying mouthfeel. Don’t forget a touch of freshly cracked black pepper or nutmeg in your cheese mix for subtle warmth.
Techniques for Building Stable and Even Lasagna layers
to master the art of seamless assembly, start by spreading a thin film of sauce across the pan’s base to guard against sticking and uneven cook times. When layering noodles, overlap edges slightly to prevent gaps, but avoid overcrowding to allow even heat distribution.
Use an offset spatula to evenly distribute ricotta or béchamel mixtures, pressing gently to create a smooth, flat surface. Alternate each layer’s weight carefully-meat sauce, cheese, and pasta-to maintain structural integrity and prevent collapse. For best results, refrigerate the assembled lasagna for 30 minutes before baking; this helps the layers ”set” and slice cleanly.
secrets to Achieving a Golden-Crisp Top and Gooey Center
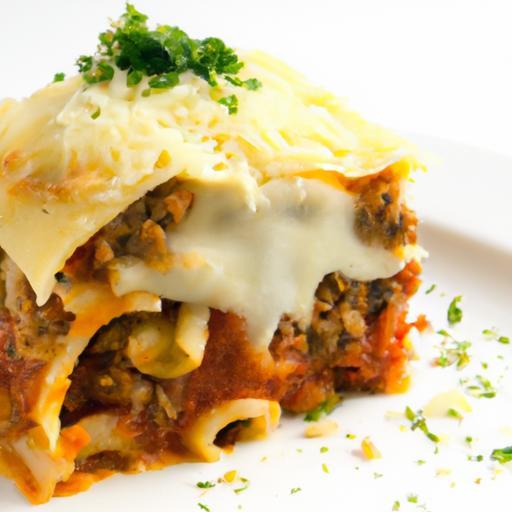
Unlocking the perfect finish involves a balance of temperature and time. Baking covered with foil maintains moisture and intensifies melting,while uncovering during the last 15 minutes allows the top to transform into a golden,bubbling crown. For that enticing crisp edge, broil on high for 2-3 minutes after baking, watching closely to avoid burning.
Additionally, brushing the top layer of mozzarella with a light mist of olive oil or sprinkling extra Parmesan encourages luscious browning. The gooey center is nurtured by generous layering of cheeses and moist sauces-another reason why quality ingredients are paramount.
Prep and Cook Time
- Prep Time: 35 minutes
- cook Time: 50 minutes
- Rest Time: 30 minutes (for setting)
Yield
serves 8 hearty portions
Difficulty Level
Medium - Grate for intermediate cooks looking to refine classic techniques
Ingredients
- 12 lasagna noodles (no-boil or cooked al dente)
- 1 lb ground beef (lean)
- 3 cups tomato sauce (homemade or high-quality store-bought)
- 1 cup ricotta cheese
- 2 cups shredded mozzarella cheese
- 1/2 cup grated Parmesan cheese
- 1 small onion, finely diced
- 3 cloves garlic, minced
- 2 tbsp olive oil
- 1 tsp dried oregano
- Fresh basil leaves, chopped (optional)
- Salt and freshly ground black pepper, to taste
- 1/4 tsp ground nutmeg (for ricotta mix)
- 1/4 cup milk (to loosen ricotta)
Instructions
- Prepare the meat sauce: Heat olive oil in a large skillet over medium heat. Sauté the diced onion until translucent, about 5 minutes. Add minced garlic and cook for 1 minute more, stirring frequently.
- Add the ground beef, breaking it up with a wooden spoon. cook until fully browned and no pink remains, around 7-10 minutes.Season with salt, pepper, and oregano.
- Pour in the tomato sauce, stir to combine, and simmer on low heat for 20 minutes, stirring occasionally.
- mix the ricotta filling: In a bowl, combine ricotta, half the Parmesan, milk, nutmeg, salt, and pepper. Stir until smooth and creamy but still thick enough to spread.
- Preheat the oven to 375°F (190°C). Lightly grease a 9×13-inch baking dish.Spread a thin layer of meat sauce on the bottom to prevent sticking.
- Layer the lasagna: Place 3-4 noodles over the sauce, slightly overlapping. Spread one-third of the ricotta mixture evenly over the noodles.Sprinkle one-third of mozzarella and fresh basil if using. Spoon one-third of the meat sauce over the cheese layer.
- Repeat layering two more times,ending with a top layer of noodles,meat sauce,mozzarella,and remaining Parmesan cheese.
- Cover the dish tightly with aluminum foil and bake for 40 minutes. Remove foil and bake uncovered for an additional 10-15 minutes or until the top is golden and bubbling.
- Optionally, broil for 2-3 minutes to achieve a crispier top, watching carefully.
- Let the lasagna rest for at least 30 minutes before slicing to allow layers to set.
Tips for Success
- Substitute ground turkey or plant-based meat alternatives for a lighter or vegetarian-friendly twist without sacrificing flavor.
- Use no-boil noodles when short on time; just add a bit more sauce to keep lasagna moist.
- For a creamier variation,incorporate béchamel sauce in place of or alongside ricotta for silkier layers.
- Store leftovers tightly covered in the refrigerator for up to 3 days or freeze individual portions for up to 2 months.
- Allow the lasagna to rest-this crucial step ensures neat slices and prevents the layers from collapsing.
Serving Suggestions
serve warm slices garnished with freshly chopped basil or parsley for a splash of vibrant color. A side of crisp mixed greens tossed in lemon vinaigrette or a classic Caesar salad complements the richness beautifully. For an elegant touch, add roasted garlic bread or garlic knots on the side, perfect for mopping up every last bit of sauce.
| Nutrient | Per Serving (Approx.) |
|---|---|
| Calories | 420 kcal |
| Protein | 28 g |
| Carbohydrates | 30 g |
| Fat | 18 g |

For more inspired Italian dishes that complement your mastery of lasagna, explore our Classic Italian Pasta Recipes. To deepen your understanding of ingredient quality, visit the Serious Eats guide on homemade pasta.
Q&A
Q&A: Mastering Lasagna Layers – The Art of Perfect Assembly
Q1: Why is the layering technique so crucial when making lasagna?
A1: Think of lasagna as a delicious architectural masterpiece. Each layer - pasta, sauce, cheese, and filling – plays a vital role in balancing flavors and textures. perfect layering ensures every bite offers harmony, with moistness, creaminess, and a satisfying bite all working in unison. Without careful assembly, you risk sogginess, dryness, or uneven flavor distribution.
Q2: What’s the first step in building the perfect lasagna layer?
A2: Start with a thin, even spread of sauce on the bottom of your baking dish. This acts like a flavorful foundation, preventing the noodles from sticking and setting the stage for the layers to come. Think of it as laying down a warm, savory welcome mat for your noodles.
Q3: How should I arrange the noodles for optimal texture?
A3: Lay your noodles flat and slightly overlapping-not too much, to avoid mushiness, but enough to keep the structure intact. If using no-boil noodles, be extra gentle, as they’re more fragile.For extra precision, trim noodles so they fit snugly without curling or breaking.
Q4: What’s the secret to balancing cheese layers?
A4: Cheese layers are like the crescendo in a symphony – they need to build flavor and provide a luscious mouthfeel without overwhelming. Mix ricotta or béchamel with herbs and seasoning to add creaminess beneath the mozzarella’s melty,golden top. Alternate cheese generously but thoughtfully to ensure gooey surprises throughout.
Q5: Can I customize layering based on ingredients?
A5: Absolutely! Each ingredient is a note in your culinary score. Dense fillings like meat or vegetables should be evenly distributed to avoid heavy spots, while lighter ingredients like spinach or mushrooms benefit from nestled layers between creamier components. Layer thoughtfully to keep balance – no ingredient should overshadow the rest.
Q6: How do I avoid a watery or soggy lasagna?
A6: The key lies in controlling moisture at every layer. Drain fillings like sautéed vegetables thoroughly, use a thicker sauce, and don’t over-sauce your layers. Remember, it’s better to add sauce than drown the dish.Modulate layering with dabs of sauce rather than puddles to keep everything intact.Q7: What’s the role of resting time after baking?
A7: Patience is your best friend here. Once the lasagna comes out of the oven, let it rest for at least 15 to 20 minutes. This quiet interlude lets steam redistribute, layers set firmly, and flavors meld into a cohesive whole. Cutting too soon will turn your masterpiece into a messy mishmash.Q8: Any final tips for a visually stunning lasagna?
A8: Use a golden, bubbly cheese topping and garnish with fresh herbs like basil or parsley. Slice with a sharp knife, wiping between cuts to keep edges clean. Presentation is the final brushstroke on your layered canvas-make it as lovely as it tastes!
Mastering lasagna assembly turns a comforting dish into a culinary triumph, where every layer tells a story of flavor, texture, and care. Happy layering!
To Conclude
As you close the final layer of your lasagna masterpiece, remember that each carefully placed sheet, sauce swirl, and sprinkle of cheese is a step toward culinary harmony. Mastering the art of perfect assembly is more than just technique-it’s about understanding the balance of textures, flavors, and patience that transform simple ingredients into a comforting, show-stopping dish. So next time you embark on this layered journey, embrace the rhythm of layering with intention and creativity. After all, the secret to a truly unforgettable lasagna lies not just in what goes in the pan, but how thoughtfully it’s built-layer by delicious layer.